Frequently Asked Questions
What is Plectica?
Plectica is a visual mapping tool that helps individuals and teams organize, explain, and collaborate on complex information. Based on years of applied research on how we think and learn, Plectica works the way your brain does: by organizing parts that can be combined and connected to each other to form a complete picture.
Whether you’re diagramming an internal system, brainstorming new products, or onboarding new team members to key organizational practices, Plectica helps make things crystal clear.
What are the basic functions of Plectica?
Plectica allows you to create visual maps. The core unit of a map is a card, which can represent people, tasks, objects, or ideas. These cards can exist on their own, or be nested inside another card. A card can be connected to any other card with one or more relationship lines, and those relationships can be defined through a relationship card. A map can be viewed and edited by multiple people at the same time.
How do I get started?
Once you’ve created an account, you’ll land on your first map. You’ll be able to get started right away, or navigate to your map listing page by selecting the Plectica logo in the top left corner of your map. On your maps page, you can browse some templates or example maps that we’ve provided to help you get started with some more guidance! You can also access our handy user guide by selecting ‘’help” in the top right corner of your map to learn about more tools, actions, and shortcuts.
Basics
keyboard_arrow_right keyboard_arrow_down Create a card
A card is the basic unit. It can represent anything - a person, place, object, or any idea at all.
You can create a card in three different ways: click the card icon in the sidebar, double click on the canvas, or click and drag the card icon from the sidebar onto the canvas.
keyboard_arrow_right keyboard_arrow_down Add a part
Click add a part when a card is selected.
Or press enter after creating a part to add another.
keyboard_arrow_right keyboard_arrow_down Create a relationship
To create a relationship, click and drag the arrow that appears above your card on hover to another card. You can also select the relationship tool in the sidebar - when it appears, drag each endpoint to the two cards you are relating.
Change the relationship from an arc to an elbow by using the “Line type“ tool in the toolbar that appears at the top of your map when the relationship is selected.
keyboard_arrow_right keyboard_arrow_down Collaborate & share with others
Select the blue Share button in the top right corner of your map. From there you can invite collaborators by email, share a view-only or edit link, share a presentation, or embed your map on your website.
You can also navigate to where your collaborators’ cursors are in the map by clicking on their avatar.
keyboard_arrow_right keyboard_arrow_down Save a map
Your map activities are being saved for you automatically. Assuming your device is connected to the internet, the changes you make to your map are saved right away.
keyboard_arrow_right keyboard_arrow_down Customize text
By highlighting the text in a card you can change the font size, make it bold, italicize it, or hyperlink it.
keyboard_arrow_right keyboard_arrow_down Space to pan
Hold down your space bar while clicking and dragging to avoid grabbing cards as you pan around your map.
keyboard_arrow_right keyboard_arrow_down Undo an action
To undo any action, press command/ctrl + z. To redo, press command/ctrl + shift + z or command/ctrl + y
Workflow
keyboard_arrow_right keyboard_arrow_down Select multiple cards
Hold down shift on your keyboard and click individual cards to select them.
Or hold down shift and click and drag to select all cards in a region.
keyboard_arrow_right keyboard_arrow_down Group cards
Select multiple cards by holding down shift while clicking and dragging, then press command/ctrl + g to create a new card containing the current selection.
keyboard_arrow_right keyboard_arrow_down Move around a map
Click and drag on a blank area of the canvas to move around a map.
keyboard_arrow_right keyboard_arrow_down Center a selection in canvas
Click the button to the left of the zoom controls to center your current selection in the canvas. If no cards are selected, clicking the button will center the entire map. You can also use command/ctrl + 0 on your keyboard.
keyboard_arrow_right keyboard_arrow_down Link to a selection
With multiple cards selected, go to the three-dot-menu in the toolbar at the top of the map, and select "link to selection."
Or press command/ctrl + shift + L to copy a link to the current selection to your clipboard.
keyboard_arrow_right keyboard_arrow_down Turn off autocomplete
Click on your avatar in the upper right hand corner and select Settings from the dropdown menu to toggle autocomplete from Wikipedia or your Ideas library.
keyboard_arrow_right keyboard_arrow_down Spellcheck
To enable spellcheck, click on your avatar in the upper right hand corner and select Settings from the dropdown menu, then toggle the spellcheck setting.
keyboard_arrow_right keyboard_arrow_down Change background color
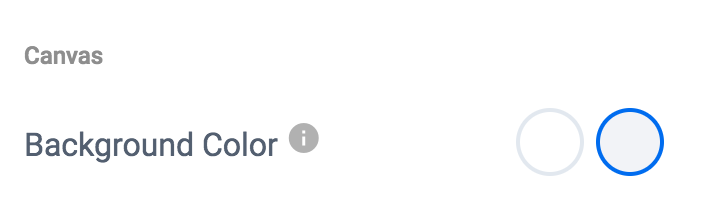
To change the default background color on all of your maps, click on your avatar in the top right corner of your map and navigate to the Settings menu. There you can switch between white and grey.
This will only apply to your own maps, and will not be visible to collaborators.
You can also access the Settings menu by right-clicking on the canvas.
keyboard_arrow_right keyboard_arrow_down Focus mode
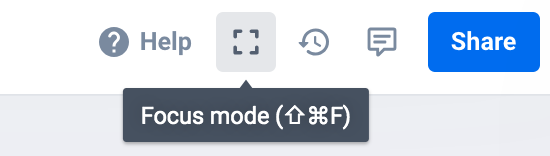
To hide all of the tools on the edges of your canvas, select the “Focus mode” icon in the top right corner of your map, to the right of the Help button.
keyboard_arrow_right keyboard_arrow_down Duplicate cards
Hold down option/alt on your keyboard and drag cards to duplicate them.
keyboard_arrow_right keyboard_arrow_down Reuse ideas
Turn on autocomplete and select autocomplete suggestions to reference canonical ideas from Wikipedia or ideas you have used previously.
keyboard_arrow_right keyboard_arrow_down Export a map

To export your map as a PDF, image, or as a JSON or CSV file - use the three dot menu to the right of your map’s title and select “Export.”
If your map has waypoints, you can also export your presentation to PowerPoint, so that each waypoint becomes its own slide.
keyboard_arrow_right keyboard_arrow_down Print a map
Print your map from the PDF or image, or use command+P on your keyboard while inside a map.
keyboard_arrow_right keyboard_arrow_down CSV import
To import content into your map from a CSV file, go to the three dot menu to the right of your map’s title, and select "Import."
keyboard_arrow_right keyboard_arrow_down View a collaborator's cards
Hover over a collaborator in the top right of a map to see the cards they've contributed.
keyboard_arrow_right keyboard_arrow_down Recent activity
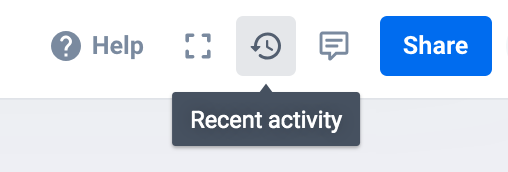
Recent activity helps you find what’s changed in a map and playback your mapping process, whether you are working alone or with others.
In the recent activity panel, you can click on an entry to see those cards in the map, or hit play to see how the map has changed over time.
Organization
keyboard_arrow_right keyboard_arrow_down Align cards in a map
Open the bulk action menu and look under 'Align' to align a selection of cards in your map.
keyboard_arrow_right keyboard_arrow_down Change card layouts
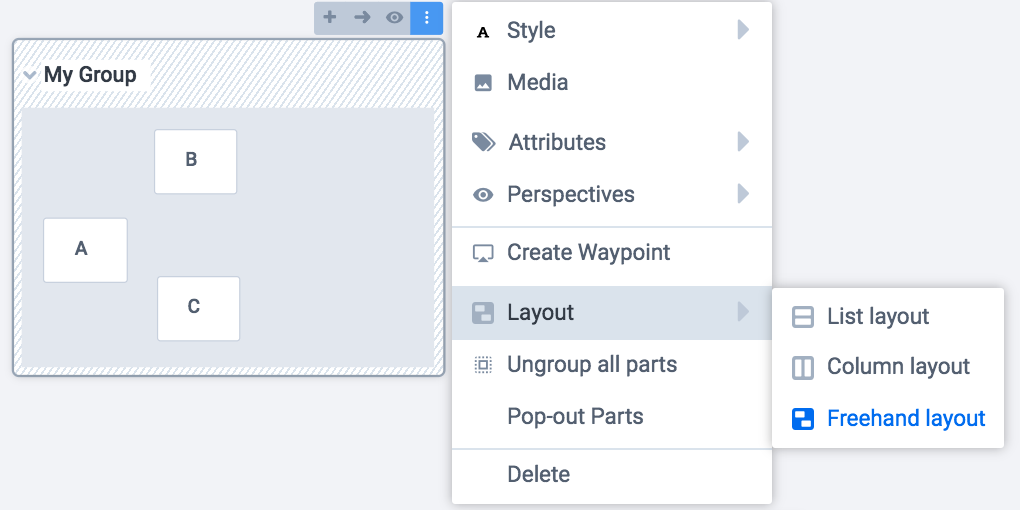
keyboard_arrow_right keyboard_arrow_down Pop out parts
Open the card menu and select 'Pop out parts' to 'pop' the parts of a card out and position them as you'd like. Popped-out parts remain tied to their parent card and move with it.
Use the menu on the popped-out parts or the parent to select 'pop in parts' and return them to their parent.
keyboard_arrow_right keyboard_arrow_down Attach a card to another
Drag and drop a card onto another to add it as a part.
keyboard_arrow_right keyboard_arrow_down Detach a card from another
Drag and drop a card off of another to remove it as a part.
Or select the "detach part" option from the card menu.
keyboard_arrow_right keyboard_arrow_down Reorder parts
Drag and drop parts within a card to reorder them.
keyboard_arrow_right keyboard_arrow_down Resize Card
Resize a card by dragging the handle in the bottom right corner of the card.
keyboard_arrow_right keyboard_arrow_down Shift to lock axis
To move your card on a locked vertical or horizontal axis, hold down the shift key on your keyboard while dragging the card.
Relationships
keyboard_arrow_right keyboard_arrow_down Change relationship directions

Right click on a relationship to open the menu, then select or deselect the directional arrows to add or remove arrowheads from the relationship.
keyboard_arrow_right keyboard_arrow_down Change relationship styles
Click on a relationship to open a menu and use the style selectors to change the relationship line's color, pattern, and thickness.
keyboard_arrow_right keyboard_arrow_down Add a card to a relationship
Click on a relationship to open a menu and choose "Add a card", or double click on a relationship to add a card.
keyboard_arrow_right keyboard_arrow_down Move a relationship's endpoints
Click on a relationship to highlight it, then grab one of its endpoints and move it to a different card.
keyboard_arrow_right keyboard_arrow_down Straighten relationship
Click on a relationship to open its menu and choose "Straighten Line".
Or select a relationship and press shift + \
Perspectives
keyboard_arrow_right keyboard_arrow_down What is a perspective?
A perspective lets you filter and describe cards on your map from a specific point of view.
The visibility eye icon identifies who or what is taking the perspective.
The dot icons identify cards that are seen in the point of view
The perspective note lets you describe the view of the perspective-taker on a specific card.
keyboard_arrow_right keyboard_arrow_down Create a perspective
keyboard_arrow_right keyboard_arrow_down Add cards to perspectives
keyboard_arrow_right keyboard_arrow_down Focus on a perspective
keyboard_arrow_right keyboard_arrow_down Add text to a perspective dot
keyboard_arrow_right keyboard_arrow_down Compare perspectives
Waypoints
keyboard_arrow_right keyboard_arrow_down About Waypoints
Waypoints enable you to navigate quickly to different cards or regions of cards. A sequence of waypoints can serve as a lightweight presentation or guided walkthrough of the map.
keyboard_arrow_right keyboard_arrow_down Create a Waypoint
You can create a waypoint in three different ways: select "add waypoint" in the waypoints sidebar and adjust the selection box around the cards you'd like to include in your waypoint, select "create a waypoint" in a card's more actions menu, or select a card and then select "add a waypoint" in the waypoints sidebar. select "create a waypoint" in a card's more actions menu, or select a card and then select "add a waypoint" in the waypoints sidebar.
keyboard_arrow_right keyboard_arrow_down Edit Waypoint Content
To edit the content of a waypoint select the waypoint's menu and click "edit." Then adjust the selection box freely.
keyboard_arrow_right keyboard_arrow_down Reorder Waypoints
To reorder waypoints, drag and drop them within the waypoints sidebar.
keyboard_arrow_right keyboard_arrow_down Delete All Waypoints
Go to the menu on the waypoints sidebar and select "delete all waypoints."
keyboard_arrow_right keyboard_arrow_down Present Waypoints
To present a map, select "start presentation" in the waypoints sidebar more actions menu, or select the waypoint you'd like to begin with.
You can navigate through the presentation using the arrows on your keyboard, or the controls at the bottom of your map.
Media
keyboard_arrow_right keyboard_arrow_down Add media to a card
To add an image, GIF, file, or video to your card - drag and drop the file onto a card or open the card menu and select media.
On a free account you can upload files up to 25MB, and on a pro account you can upload files up to 250MB.
keyboard_arrow_right keyboard_arrow_down Resize media
Hover over your attachment, go to the three-dot menu in its top right corner, and select "resize___."
keyboard_arrow_right keyboard_arrow_down Remove media from a card
Hover over your attachment, go to the three-dot menu in its top right corner, and select "delete ___."
Attributes
keyboard_arrow_right keyboard_arrow_down About Attributes
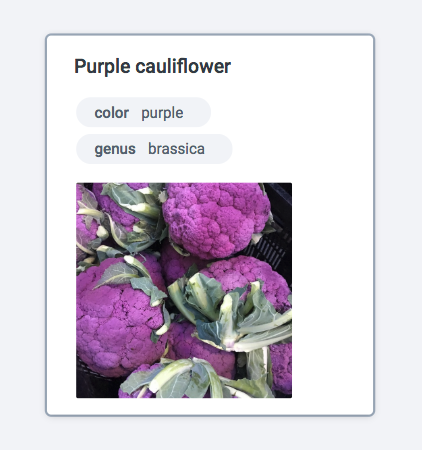
Attributes allow you to add more informational detail about cards.
Use them as additional metadata and labels, and as a tool for categorizing and filtering.
keyboard_arrow_right keyboard_arrow_down Add an attribute
In the card menu, hover over "attributes," enter an attribute name, and then an attribute value. Hit enter on your keyboard to add the attribute to your card.
keyboard_arrow_right keyboard_arrow_down Edit an attribute
Double-click or right-click on an attribute to edit it.
keyboard_arrow_right keyboard_arrow_down Focus on an attribute
Open the attributes sidebar and select the attribute you would like to focus on or filter by.
keyboard_arrow_right keyboard_arrow_down Delete an attribute
Double-click or right-click on an attribute to remove it from the card.
Regions
keyboard_arrow_right keyboard_arrow_down About Regions
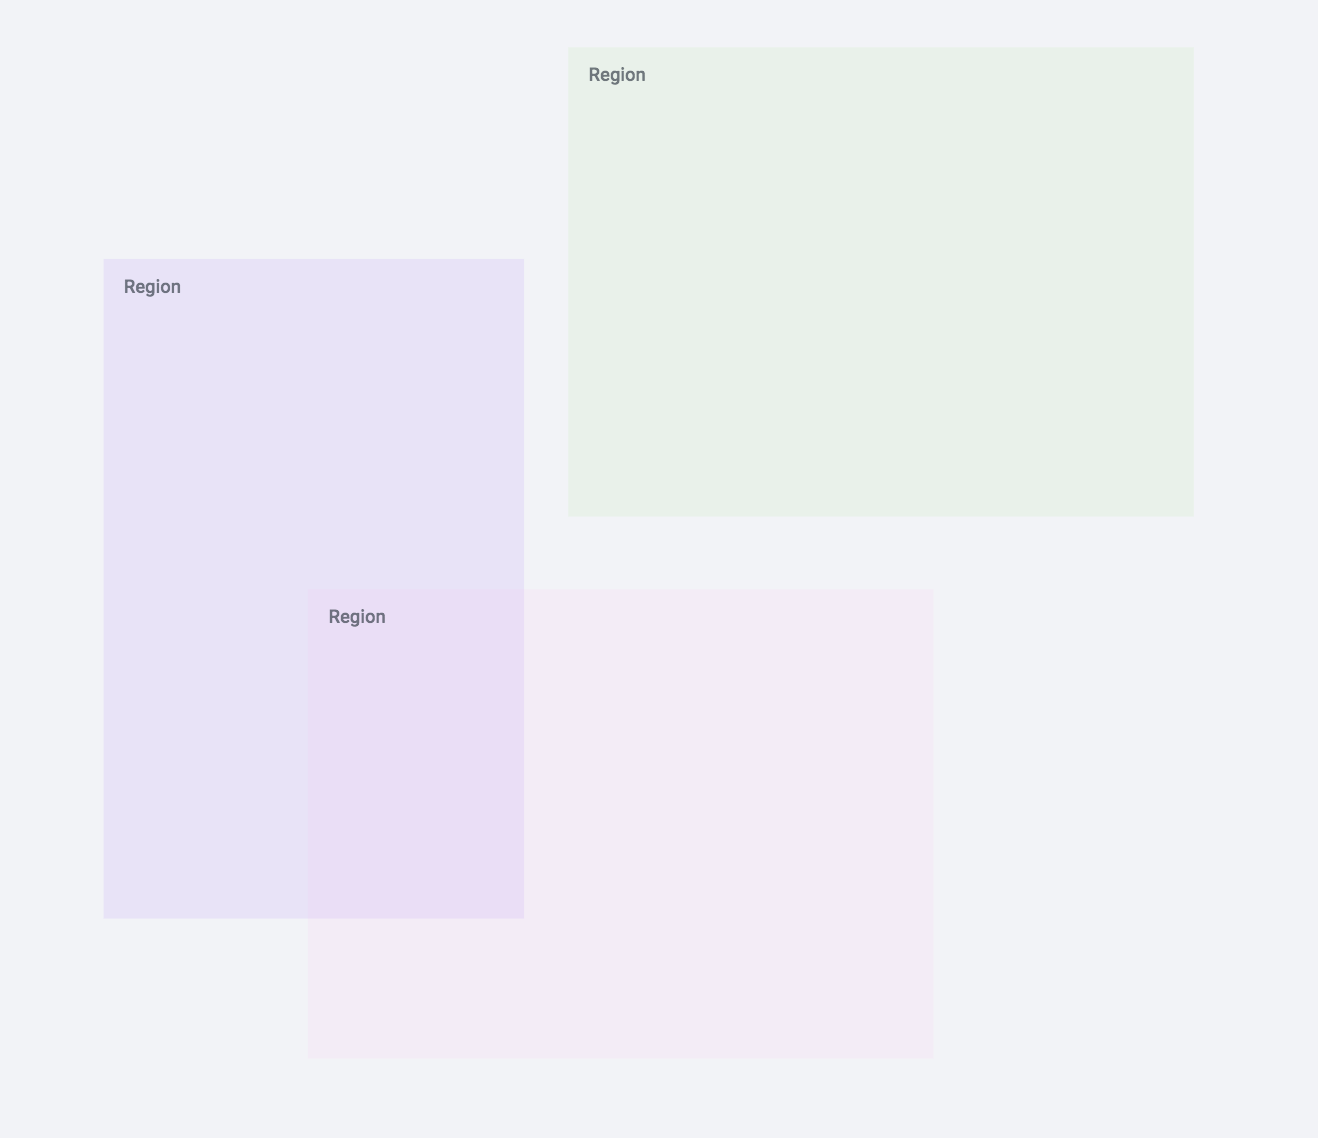
Regions allow you to add resizable and overlapping containers on the canvas behind your cards.
Use them to organize the contents of your map and create color-coded groupings of cards.
keyboard_arrow_right keyboard_arrow_down Create a region
Use regions to identify sections of the canvas.
You can create a region in three different ways: click the region icon in the sidebar, click and drag the region icon from the sidebar onto the canvas, or right click and select "create a region."
keyboard_arrow_right keyboard_arrow_down Move a region
To reposition a region, drag the shaded title bar near the top border of the region.
To reposition a region and everything inside it,
keyboard_arrow_right keyboard_arrow_down Resize a region
To change the size a region, drag the resize handles that appear when hovering over any of the region's edges.
keyboard_arrow_right keyboard_arrow_down Delete a region
Delete a region by right clicking inside the region and selecting "Delete region" from the right-click menu
Or select "Delete region" when expanding the three dot menu at the top right corner of the region.
Privacy
keyboard_arrow_right keyboard_arrow_down Privacy and security
Your maps are 100% private, unless you decide to proactively share them with a collaborator or viewer. For more information, head to our security, privacy policy, and terms of service pages.